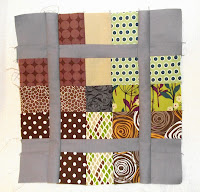
Based on a block I found from imalisawork on flicker.
Ingredients:
Solid for corner blocks and sashing
9 printed fabrics
From 1 printed fabric, cut 1 squares measuring 2.5" - this will be the center square
From 2 printed fabrics, cut 2 squares measuring 2.5", each.
From 2 printed fabrics, cut 2 squares measuring 2.5", each.
From 2 printed fabrics, cut 1 rectangle measuring 2.5" x 5", each.
From 4 printed fabrics, cut 1 rectangle measuring 2.5" x 5" and 1 square measuring 2.5", each.
*Since I'm visual I usually cut 1 rectangle and 1 square from each fabric and just add that to my scraps for another project.
*Since I'm visual I usually cut 1 rectangle and 1 square from each fabric and just add that to my scraps for another project.
From solid fabric, this will be the corner squares and the sashing. Cut the following:
4 squares measuring 2.5" - corners
4 rectangles measuring 1.5" x 2.5" - small sashing
2 rectangle pieces measuring 1.5" x 6.5" - medium sashing
2 rectangle pieces measuring 1.5" x 12.5" - long sashing
 Use a 1/4" seam for all sewing throughout this block.
Just lay out what you've done and how you want to arrange these beauties. This is where the extra pieces come in handy.
Step 4 - Sewing
 You'll be sewing a 9 patch at this point in time. Just make sure that you use the 4 printed fabrics with the extra 2.5" squares on the "outside" of the top and bottom rows.
 *To the right is an experimental photo where I used 9 rectangles but I found the side piece didn't "save any time". I therefore would eliminate this step as included in these instructions.*
Step 5 - slashing
 Taking your extended 9 patch, measuring 2.5" from the outside raw edge of the rectangles.
I should have a clean 9 patch and 2 three colored blocks.
*You can use 2.5" squares for this instead of slashing but you will have to pay attention to make sure that the fabrics match up properly. *
Step 6 - sashing
Step 6 - sashing
Between the the cuts you just made, sew the the medium sashing.
Step 7 - side column construction
On each of the side columns you'll use, from the top, solid 2.5" square, 2.5" x 1.5" short sashing, corresponding 9-patch color to match center, 2.5" x 1.5" shortest sashing, solid 2.5" square. This should result in 3 pieces as shown in the picture below:
Sew column A and C to large sashing. Then add these to column B (with the 9 patch).
Should look like this
Your unfinished block should measure 12.5" square.
*Many thanks to my {Modern 12} bee group for weathering through this first attempt of a tutorial
*Many thanks to my {Modern 12} bee group for weathering through this first attempt of a tutorial


